
This blog is a walkthrough at how Magento Cloud and Magento Marketplace can be used together. I put this together as
- an exploration of development flows and experiences, and
- to share a bit more about the two products for those interested.
What I personally am particularly interested in is exploring the potential experience for low end hosting solutions. This blog demonstrates a simple project that does not involve significant development effort, simpler than what most Solution Providers would implement. This experience may be also relevant to merchants with simple requirements using hosting providers such as GoDaddy, AWS Quickstart, Cloudways, Digital Ocean, or similar providers with “single click” Magento 2 installation processes.
Magento Cloud
The following screens shots summarize creating a new empty project on Magento Cloud. (I skip registration and login.)
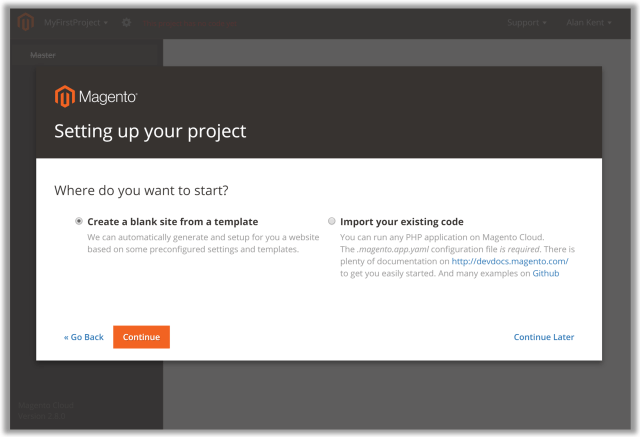
Creating a first project starts by asking for a project name. Here I used “MyFirstProject” as the project name. In Magento Cloud, projects have a Git repository, and a series of environments suitable for production and development tasks such as testing.

A new project can be created from source code of an existing project, or can be started from a blank template (similar to running composer create-project). Starting from a blank project is the approach we are going to use here.
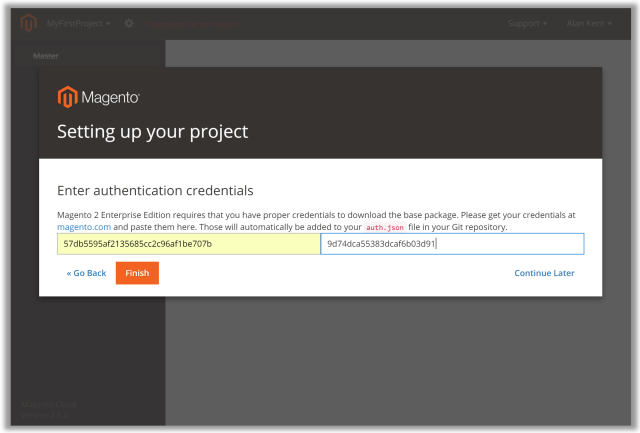
Next the Magento Marketplace Composer repository access keys must be provided. These keys can be obtained from the Marketplace. Copy and paste these strings into the form below. This the case of Magento Cloud, these keys give access to the Magento Cloud Enterprise Edition code base. (One future improvement under consideration is to share the concept of “projects” between Magento Marketplace and Magento Cloud to avoid need for copying and pasting keys manually.
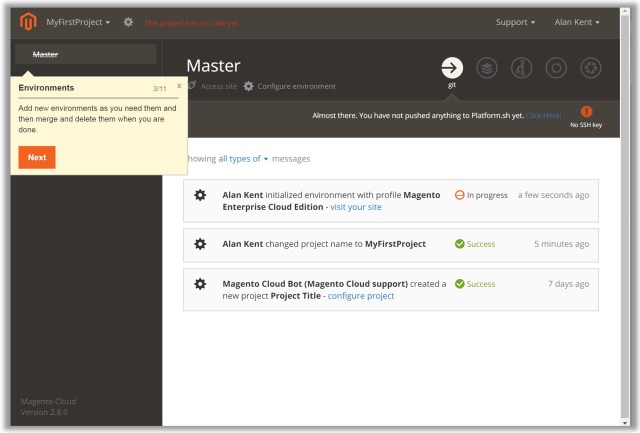
After the keys have been entered, Magento Cloud provisions an instance in the cloud using the code base. (The first time this is done the tool takes the user through a wizard introducing the capacities of Magento Cloud.)
Once the environment is fully provisioned, the next step is to install the Magento Cloud command line tool. The installation procedures are described in http://devdocs.magento.com/guides/v2.0/cloud/before/before-workspace.html. (Windows users should use Cygwin to ensure correct behavior, not a Windows CMD prompt.)
In summary the commands to install the Magento Cloud CLI are:
$ curl -sS https://accounts.magento.cloud/cli/installer | php
$ source ~/.bashrc
You can then run the “magento-cloud” command.
$ magento-cloud
Checking for updates (current version: 1.0.1)
No updates found

Welcome to Magento Cloud!

Please log in using your Magento Cloud account.

Your email address: akent@magento.com
Your password:

You are logged in as akent@magento.com.

Your projects are:
+---------+----------------+---------------------------------------------+
| ID      | Title          | URL                                         |
+---------+----------------+---------------------------------------------+
| re3kst4 | MyFirstProject | https://us.magento.cloud/#/projects/re3kst4 |
+---------+----------------+---------------------------------------------+

Get a project by running magento-cloud get [id]
List a project's environments by running magento-cloud environments

Manage your SSH keys by running magento-cloud ssh-keys

Type magento-cloud list to see all available commands.
To access Magento Cloud, you need to set up SSH keys.
$ magento-cloud ssh-key:add
Use existing local key id_rsa.pub? [Y/n] y
Enter a name for the key [L-SJC-10002042]: id_rsa_akent
The SSH key id_rsa.pub has been successfully added to your Magento Cloud account.

$ magento-cloud ssh-keys
Your SSH keys are:
+-----+--------------+----------------------------------+
| ID  | Title        | Fingerprint                      |
+-----+--------------+----------------------------------+
| 286 | id_rsa_akent | 52bfa3133d3ad71d61063f2264d24b32 |
+-----+--------------+----------------------------------+

Add a new SSH key with: magento-cloud ssh-key:add
Delete an SSH key with: magento-cloud ssh-key:delete [id]
With the keys in place you can use “git clone” to check out the code locally, or you can use the Magento Cloud command line to do it for you.
$ magento-cloud get re3kst4
Directory [myfirstproject]:
The authenticity of host 'git.us.magento.cloud (52.200.159.125)' can't be established.
RSA key fingerprint is SHA256:9RLzQdgIN4IO+7Iubsa3Y3vc1pz9XluUFQRgXzi7ZAM.
Are you sure you want to continue connecting (yes/no)? yes
Downloading project MyFirstProject
  Cloning into '/cygdrive/c/Users/akent/git/cloud/myfirstproject'...
  Checking out files: 100% (8321/8321), done.

The project MyFirstProject was successfully downloaded to: myfirstproject

You can build the project with:

    cd myfirstproject
    magento-cloud build

$ cd myfirstproject/
$ ls -a
.                  .php_cs           composer.lock         LICENSE.txt        pub
..                 .travis.yml       CONTRIBUTING.md       LICENSE_AFL.txt    README.md
.git               app               CONTRIBUTOR_LIC.html  LICENSE_EE.txt     setup
.gitignore         auth.json         COPYING.txt           magento-vars.php   var
.htaccess          auth.json.sample  dev                   nginx.conf.sample
.htaccess.sample   bin               Gruntfile.js          package.json
.magento           CHANGELOG.md      index.php             php.ini
.magento.app.yaml  composer.json     lib                   phpserver
To access the development environment site, returning to the Magento Cloud control panel there is an “Access site” drop down that includes the URL for accessing your site.

Great! We have a site up! What is next? For this blog post I want to show how the integration with Marketplace works. The process is going to basically be:
- Find an extension
- Add it to the composer.json file
- Git commit and push
- Shortly afterwards it will be available for use.
Note: This example does not include any testing before committing the new extension to the repository. Instead, the complete build processes for putting the store into production mode and cutting across the site are done for you when you push to the Git repo. None of the above steps required anything more than a Git client and a text editor. Not even PHP had to be installed.
(For brevity, I am not going to describe branching and creating multiple environments in this post as the focus is really on the extension experience.)
Magento Marketplace
Unlike Magento Cloud above where you need to be a customer to access the Magento Cloud UI, anyone can try the following steps (a magento.com account will be required to complete the checkout flow). Let’s first find an extension to install.
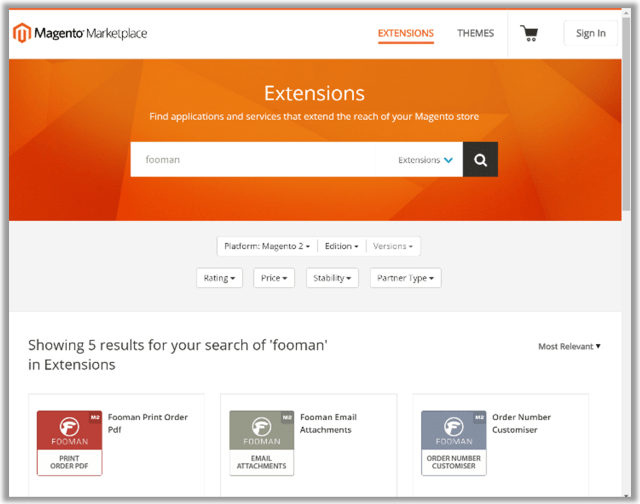
Go to http://marketplace.magento.com and search for “Fooman”. Select the “Fooman Print Order Pdf” extension. (You can pick any extension you like – I use Fooman’s extension because it is free.)
Clicking on the “Print Order PDF” extension brings up a details page.
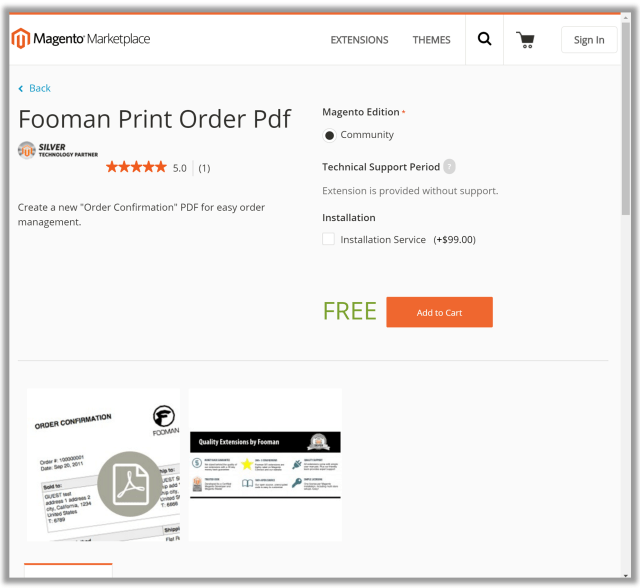
Click the “Add to Cart” button to add the extension to your shopping cart. Even though the extension is free, you must “check out” the extension to make it available in your personalized composer repository.

Click the “Go to Checkout” link to check out the extension to complete the purchase. This will trigger a login request to identify who the user is. Until this stage you will have been browsing the Marketplace anonymously.

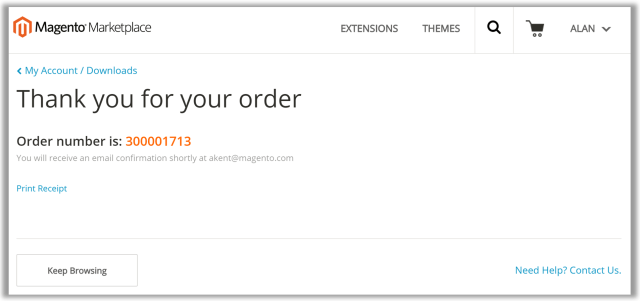
Once logged in, review your order for correctness. Then click “Place Order” to submit the order for processing.

After the order has been place, you will receive a confirmation page with an order number for your new request. This is the last required page of the Magento Marketplace experience required to make an extension available for download via composer.
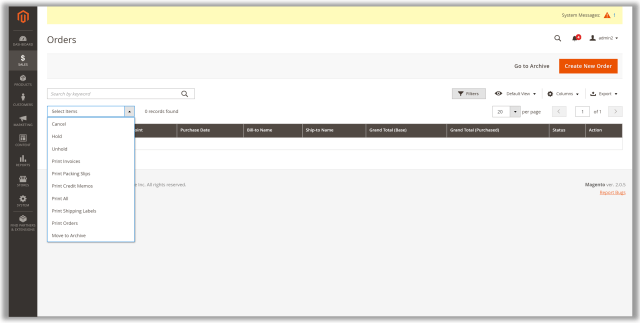
Before installing the module, log in to the Magento administration interface, and check the “Orders” page drop down list of actions. In particular, note there is no “Print Orders” menu item. This new menu item will be added once the extension is installed.

In a recent previous post, I shared a script that prints out the Composer repository details, making it easier to spot what to add to your composer.json file to load the extension.
$ php pkglist.php
...
fooman/printorderpdf-m2 [magento2-module]
    2.0.2 magento/module-backend:~100.0.2 magento/module-sales:~100.0.2
    Print the order as a pdf from the admin
...
UPDATE 9/19/2016: You can now get the package name and version number from the Marketplace from the My Purchases page – there is no need to use the above script. Simply click the “Technical Details” drop down under the extension to get the component name and version number.

Edit the file to add “fooman/printorderpdf-m2”: “2.0.2” to the require section.
"require": {
    "magento/product-enterprise-edition": "2.0.5",
    "composer/composer": "@alpha",
    "magento/magento-cloud-configuration": "1.0.*",
    "colinmollenhour/credis": "1.6",
    "colinmollenhour/php-redis-session-abstract": "1.1",
    "fooman/printorderpdf-m2": "2.0.2"
},
[Added as suggestion from comments]: Alternatively, use “composer require” to add the new entry to the composer.json file for you.
$ composer require fooman/printorderpdf-m2 2.0.2
Finally commit and push the change to the Magento Cloud Git repository. This will push the updated composer.json file to the Cloud, causing the site to be updated with the new code.
$ git add composer.json
$ git commit
$ git push
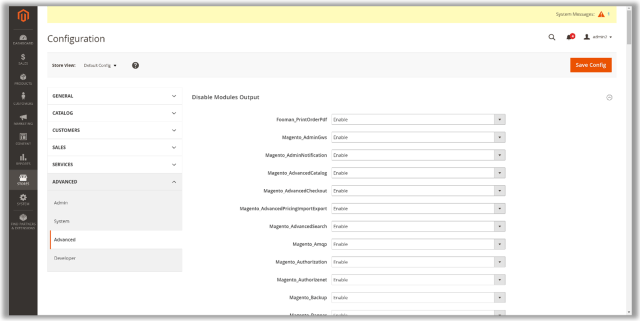
Logging on to the administration interface again you can see if the module has been loaded by navigating to Stores > Configuration > Advanced > Advanced. The new Fooman_PrintOrderPdf module will be displayed as one of the available modules to enable/disable.
In addition, going back to the “Orders” screen you can now see in the drop down list a new “Print Orders” menu item that was not present before.
Conclusion
This completes this walkthrough of the Magento Cloud deployment experience and using Magento Marketplace to locate and install an extension into the cloud.
The above experience, while illustrated using Magento Cloud, can potentially be supported by other hosting providers as well. There is no special capabilities of Magento Cloud in the area of software deployment. The process has been automated and hooked into the push to the Git repository, but other hosting partners can implement the same experience if they wish. Even if Git is not used, other deployment shell scripts could be used to simplify the deployment of changes to production.

Thanks for giving us the inside scoop on this!
For what it’s worth, I typically find it easier to use composer commands to do things like adding repositories and dependencies, rather than editing the composer.json file directly. e.g.:
composer require fooman/printorderpdf-m2 2.0.2
Yes, agree. I should have done that in hind site.
Thanks again for letting us translate this helpful walkthrough in our blog !
Avec l’aimable autorisation d’Alan Kent, nous vous proposons une traduction française de ce tutoriel Magento Cloud aux adresses ci-dessous :
Magento Cloud : comment créer un nouveau projet ? http://www.x2i.fr/2016/magento-cloud-tutoriel/
Comment intégrer un module issu de la MarketPlace Magento : http://www.x2i.fr/2016/magento-cloud-module-marketplace/
N’hésitez pas à les partager au besoin.
You should also commit composer.lock as Cloud only runs composer install. Composer update (which would update composer.lock based on composer.json) could potentially bring unexpected versions of components.
Thanks Alan, I am surprised now with my Magento store after installing on GCE with the help of this guide, But due to website loading issue, I moved it to Cloudways managed hosting and their support team now manage it and also it scale when there is a load of users, https://www.cloudways.com/blog/magento-on-google-cloud/, this is the guide that helped me while installing GCE on Magento with cloudways.